Difference between revisions of "Backing up your emails in Outlook"
(→IMAP) |
(→POP3 & IMAP) |
||
| (78 intermediate revisions by the same user not shown) | |||
| Line 1: | Line 1: | ||
Outlook stores emails in a special proprietary database format called '''PST'''. PST files are very prone to corruption and data loss. For this reason we do '''not''' recommend using Outlook. If you ''are'' currently using Outlook, this guide will explain how to export your PST file for ''local'' backup. This file can then be saved to external media like flash sticks or external hard drives for on-site and off-site backup. | Outlook stores emails in a special proprietary database format called '''PST'''. PST files are very prone to corruption and data loss. For this reason we do '''not''' recommend using Outlook. If you ''are'' currently using Outlook, this guide will explain how to export your PST file for ''local'' backup. This file can then be saved to external media like flash sticks or external hard drives for on-site and off-site backup. | ||
| − | If you're using Imaginet's [ | + | If you're using Imaginet's [https://www.imaginet.co.za/product/products/cloud.html Stratus Cloud Backup] service, you can back up your main PST file '''without having to export it''', however it is still recommended that you crate local on-site and off-site backups as part of a [https://www.nccoe.nist.gov/sites/default/files/legacy-files/msp-protecting-data-extended.pdf 3-2-1 backup strategy]. |
=Before you begin= | =Before you begin= | ||
| Line 14: | Line 14: | ||
=='''WARNING'''== | =='''WARNING'''== | ||
| − | If you have a lot of emails it may be safer, faster, and easier to back up your mail via POP3. | + | If you have a lot of emails it may be safer, faster, and easier to back up your mail via POP3 with a temporary setup. [[Creating a temporary pop3 account for email backup and migration|Click this link for more info about this option]]. |
=Outlook 2010= | =Outlook 2010= | ||
| − | ==IMAP== | + | ==IMAP== |
| − | {| | + | {| |
| − | | style="width: | + | | style="width: 50%" id="outlook_2010_imap_backup_steps" aria-label="outlook_imap_backup_steps"| <ol> |
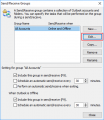
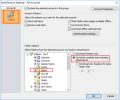
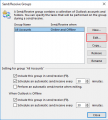
<li>Configure Outlook to download complete emails | <li>Configure Outlook to download complete emails | ||
<ol> | <ol> | ||
| Line 48: | Line 48: | ||
</li> | </li> | ||
</ol> | </ol> | ||
| − | | style="width: | + | | style="width: 50%; height: 650px; vertical-align: top;" aria-describedby="outlook_2010_imap_backup_steps"|<gallery mode="slideshow" style="vertical-align:top"> |
| − | File:Ol-2010-imap-backup.png | + | File:Ol-2010-imap-backup.png|'''Step 1.4:''' Send/Receive Groups |
| − | File:Outlook-2010-sendrecive-groups.png| | + | File:Outlook-2010-edit-groups.png|'''Steps 1.5 - 1.6:''' Edit all accounts |
| + | File:Outlook-2010-sendrecive-groups.png|'''Step 1.7:''' Download complete items including attachments | ||
</gallery> | </gallery> | ||
|} | |} | ||
| Line 56: | Line 57: | ||
==IMAP & POP3== | ==IMAP & POP3== | ||
Export your PST file. | Export your PST file. | ||
| − | <ol> | + | {| |
| − | <li>Click | + | | style="width: 50%" id="outlook_2010_pst_export_steps" aria-label="outlook_2010_pst_export_steps"| <ol> |
| − | <li>Click | + | <li>Click the <kbd>File</kbd> tab.</li> |
| − | <li>Click | + | <li>Click <kbd>Options</kbd></li> |
| − | <li>Click | + | <li>Click <kbd>Advanced</kbd></li> |
| − | <li> | + | <li>Click <kbd>Export</kbd></li> |
| − | <li> | + | <li>Click <kbd>Export to a file</kbd></li> |
| − | <li>Click Finish to complete the process | + | <li>Click <kbd>Next</kbd></li> |
| + | <li>Click <kbd>Outlook Data File (.pst)</kbd></li> | ||
| + | <li>click <kbd>Next</kbd></li> | ||
| + | <li>Select the folders to export. To export your entire mailbox, click the mailbox. The mailbox will usually display your email address.</li> | ||
| + | <li>Make sure the <kbd>Include Subfolders</kbd> box is ticked</li> | ||
| + | <li>Click <kbd>Next</kbd></li> | ||
| + | <li>Click <kbd>Browse</kbd> and select a location to save the exported file</li> | ||
| + | <li>Click <kbd>Finish</kbd> to complete the process</li> | ||
</ol> | </ol> | ||
| + | | style="width: 50%; height: 500px; vertical-align:top;" aria-describedby="outlook_2010_pst_export_steps"|<gallery mode="slideshow" style="vertical-align:top"> | ||
| + | File:Outlook-2010-options.png|'''Step 2:''' Click '''Options''' | ||
| + | File:Outlook-2010-advanced-export.png|'''Steps 3 & 4:''' Click '''Advanced''' and then '''Export''' | ||
| + | File:Filemenu 2.png|'''Step 5:''' Export to a file | ||
| + | File:Filemenu 3.png|'''Step 7:''' Outlook Data file (.pst) | ||
| + | File:Filemenu 4.png|'''Step 9:''' Select folders to export | ||
| + | File:Filemenu 5.png|'''Step 12:''' Browse and choose where to save the file | ||
| + | </gallery> | ||
| + | |} | ||
| − | =Outlook 2013, 2016, | + | =Outlook 2013, 2016, 2021, and 365= |
==IMAP== | ==IMAP== | ||
| − | <ol> | + | {| |
| + | | style="width: 50%;" id="outlook_2013_2016_groups" aria-label="outlook_2013_2016_groups"| <ol> | ||
<li>Configure Outlook to download complete emails | <li>Configure Outlook to download complete emails | ||
<ol> | <ol> | ||
| Line 86: | Line 104: | ||
<li>Click <kbd>File</kbd></li> | <li>Click <kbd>File</kbd></li> | ||
<li>Click <kbd>Account Settings</kbd>.</li> | <li>Click <kbd>Account Settings</kbd>.</li> | ||
| − | <li>Click | + | <li>Click <kbd>Account settings...</kbd> (the first option in the dropdown list).</li> |
<li>Click the <kbd>Data Files</kbd> tab</li> | <li>Click the <kbd>Data Files</kbd> tab</li> | ||
<li>Click <kbd>Add...</kbd> to create a new ''.pst'' file</li> | <li>Click <kbd>Add...</kbd> to create a new ''.pst'' file</li> | ||
| Line 97: | Line 115: | ||
</li> | </li> | ||
</ol> | </ol> | ||
| + | | style="width: 50%; height: 600px; vertical-align: top;" aria-describedby="outlook_2013_2016_groups"|<gallery mode="slideshow" > | ||
| + | File:Outlook-20132016groups.png|'''Step 1.3:''' Click '''Define Send/Receive Groups''' | ||
| + | File:Outlook-20132016-all-accounts.png|'''Steps 1.5 & 1.6''' Edit All | ||
| + | File:Outlook-2016-new-pst.png|'''Steps 2.4 - 2.5''' Add a new data file | ||
| + | </gallery> | ||
| + | |} | ||
| + | |||
| + | ==IMAP & POP3== | ||
| − | |||
Export your PST file | Export your PST file | ||
| − | <ol> | + | |
| + | {| | ||
| + | | style="width: 50%" id="outlook_2016_2021_PST_backup" aria-label="outlook_2016_2021_PST_backup" | <ol> | ||
<li>Click <kbd>File</kbd></li> | <li>Click <kbd>File</kbd></li> | ||
<li>Click <kbd>Open & Export</kbd></li> | <li>Click <kbd>Open & Export</kbd></li> | ||
| Line 112: | Line 139: | ||
<li>Click <kbd>Finish</kbd></li> | <li>Click <kbd>Finish</kbd></li> | ||
</ol> | </ol> | ||
| − | + | | style="width:50%; vertical-align:top" aria-describedby="outlook_2016_2021_PST_backup" | <gallery mode="slideshow" > | |
| − | + | File:Filemenu 1.png|'''Step 1:''' Import and Export | |
| − | + | File:Filemenu 2.png|'''Step 2:''' Export to a file | |
| − | + | File:Filemenu 3.png|'''Step 3:''' Select Outlook Data File (.pst) | |
| − | + | File:Filemenu 4.png|'''Step 4:''' Select the mail folder or folder to back up | |
| − | + | File:Filemenu 5.png|'''STep 5:''' Choose a location and name for your backup file | |
| − | + | </gallery> | |
| − | + | |} | |
| − | |||
| − | </ | ||
Latest revision as of 12:15, 21 September 2023
Outlook stores emails in a special proprietary database format called PST. PST files are very prone to corruption and data loss. For this reason we do not recommend using Outlook. If you are currently using Outlook, this guide will explain how to export your PST file for local backup. This file can then be saved to external media like flash sticks or external hard drives for on-site and off-site backup.
If you're using Imaginet's Stratus Cloud Backup service, you can back up your main PST file without having to export it, however it is still recommended that you crate local on-site and off-site backups as part of a 3-2-1 backup strategy.
Contents
Before you begin
If you're using a POP3 account, you can simply export your PST file.
If you're using an IMAP account, your emails will not be stored in a PST file, but in an OST file. It's best not to alter this file in any way, since it syncs with your mail server. To back up your emails safely, you can create a new PST file, and then copy and paste the emails you want to back up into a separate folder.
It is important that you copy your emails, so that your account will not be affected.
Once done, you can proceed to the export step.
WARNING
If you have a lot of emails it may be safer, faster, and easier to back up your mail via POP3 with a temporary setup. Click this link for more info about this option.
Outlook 2010
IMAP
|
IMAP & POP3
Export your PST file.
|
Outlook 2013, 2016, 2021, and 365
IMAP
|
IMAP & POP3
Export your PST file
|


